
1) Realize Your Limitations
Before dismissing this article as irrelevant, realize that shooting in RAW is not the absolute white balance fix. First and most importantly, there may be situations where you have mixed lighting, e.g. flash in tungsten rooms, window light in fluorescent rooms, etc; Understanding white balance and color temperatures will help you mitigate (or accentuate) the effects of the mixed lighting to suit your desired results.
Secondly, the more color correction you need in post processing, the longer your work flow becomes. And lastly, if your client wants to see the results in camera, you want your image looking as good as it possibly can. So basically, read this article and start mastering white balance and color temperatures.
2) Find The White Balance Settings
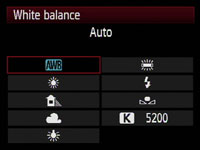
3) Memorize The Icons
What’s the weird icon with a square the two triangles, what’s that weird rectangle that seems to be glowing, and what’s K 5200? It’s important to memorize the chart on the left. Note that selecting custom white balance requires a subsequent step of selecting an image displaying a white (or neutral) color. This is not the focus of this article, but you can find plenty of video and written tutorials on setting your custom white balance. Also note that K is not mentioned in the chart on the left. The K stands for Kelvin, the unit of measurement for the temperature (or color) of light. We’ll talk more about this in step 3.
4) Understand and experiment with K
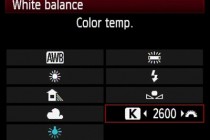
5) Understanding Light Temperatures/Colors
Everything seems pretty straight forward so far right? Well now it’s important to check out the chart on the left. In the chart, you will see that the lower the Kelvin the more orange the color of the light, conversely, the higher the Kelvin the more blue the color of the light. So what exactly does this mean? Well, this means that if we are shooting in a Tungsten (3000K) lit room, setting our cameras to 3000K will result in the light being “neutral” or white. If we go down from there to say 2500K, the light will turn more blue and hence we would be “cooling off” the image, and if we go up from there say to 3500K the light will turn more yellow/orange and hence we would be “warming up” the image.

When you hear someone say, “I prefer to produce my pictures slightly on the warmer side” or perhaps “slightly on the cooler side.” That isn’t a reference to the actual temperature of the color, but rather it is a reference to how the white balance is set in relation to the temperature of the light in the scene. For example, the person that prefers slightly warmer images would post produce a Tungsten (3000K) image to have a white balance of 3300K. Thus, the overall color would be more yellow and more warm. To make daylight sun (5500K) look warm, that same person would post produce it with a white balance of perhaps 5700K or some amount above 5500K where the light is neutral and white.
Conversely, if someone prefers their images “cooler” they would do the opposite. If the light in the image was Tungsten (3000K) or Daylight (5500K) they would post produce with a white balance of 2800K or 5300K respectively. Any temperature setting lower than the color temperature of the light in a scene, will yield a more blue or “cooler” image.
6) Memorize Common Kelvins
At this point, it’s beneficial to get back into practical application. So you walk into a hotel ballroom, and notice that the lights are tungsten(ish). Try setting your K low, somewhere between 2500 and 3500 (depending on your preference for warmth or coolness). What do you do if the picture is too orange? At this point, you should know how to troubleshoot this issue by going into your settings and decreasing the kelvins. If it’s too blue, try going the opposite direction. What if you go back outside to sunlight or if you’re using flash (which is approximately the same as sunlight)? Go up to around 5000 to 5500K and fiddle around until you’re happy. The 3000 range and the 5000 range are probably the two most common ranges you’ll experience and therefore worth memorizing.
7) Troubleshoot Mixed Lighting
So why does all of this matter? Shouldn’t AWB take care of it all? As we mentioned, often times AWB will get it right, particularly in simple situations like in daylight. But you’re going to run into issues when you have mixed lighting in the scene. When your flash is turned on, AWB automatically goes to the Flash white balance setting (5500K). In a tungsten setting, this makes already yellow Tungsten lighting become a muddy orange. For the sake of learning, let’s rehash why this is the case. Your camera setting is around 5500K, which makes your flash lighting white. This is great for your subjects, but remember that in order for your yellow/orange tungsten backgrounds to be white, your camera settings need to be lower around the 3000K range. So, since the flash is at approximately 5500K while your background is at around 3000K, post producing the flash to look correct will cause your backgrounds to be 2500K too high, and thus unnaturally orange. While on the other hand, post producing the scene to match your background Tungsten light of 3000K will result in your 5500K flash coming out completely blue, giving you smurfs for subjects. So now instead of wondering why your images are producing strange colors, you should now be able to troubleshoot and decide for yourself what effect you want.
8) Using Gels
The next step in learning white balance and color matching can be learned by picking up a set of Gels for your flash. We’ll get further into Gels in a later tutorial that branches off of the understanding you gained from this article, but we wanted to give you a brief example of what gels can do for your photography. Basically if you stick a gel over your flash that matches the color of lighting in the background, then set your K accordingly, you can effectively match the light in the foreground and background. In the picture below, notice the clean and consistent lighting from the subjects to the background from a geled flash inside of a tungsten(ish) lit room. As I mentioned, we’ll get into this in another article, but this should give you a quick introduction to the subject matter; and furthermore, you should have a decent idea of the white balance concepts at play in the image.

In this image, we took off the tungsten gel on the hair light flash (leaving it at standard flash temperature of 5500K) while using Tungsten (3000K) lights to illuminate their faces and bodies. This combination exaggerates the background blues.

By underexposing this daytime image, using a tungsten geled flash in the front and a tungsten geled flash source as a hairlight from behind, the daylight turns an exaggerated blue in the sky in the background.

Using a tungsten light source from the front, placing an off-camera flash (at a standard daylight temperature of 5500k-ish) in the back, and positioning the subjects in an ally with green background lights creates scene with an interesting interaction between the colors.

Credit to http://www.slrlounge.com/tutorial-understanding-white-balance-color-temperatures-in-8-simple-steps